The steps below will describe how to configure and send an email invitation to individuals from Common Benefits Administrator notifying them about self-service enrollment. Custom text may be used for the subject line and message body.
Note: notification emails may also be scheduled to send at a certain date and time. This type of notification uses default text for the subject line and message body and is not customizable. The scheduling of these notifications is handled in the enrollment session settings. Please refer to the following article for an overview of this type of notification.
Prerequisites
- This feature is only available if self-service is configured for the Company.
- Invitations are sent after Benefits have been enabled for Self Service and Self Service Settings configured.
- The Employee’s record will need to contain an email address.
- Archived Employee records will not be sent an Invitation
From the company Home screen, click Self Service and then Invitations.
The audience to receive the invitation is first selected. Invitations may be sent to a group of employees or to individually selected employees.
SENDING INVITATIONS TO A GROUP OF EMPLOYEES
Using the Group tab, invitations can be sent to groups of employees based on their Employment Status , Class , Location , Division or Hire Date .
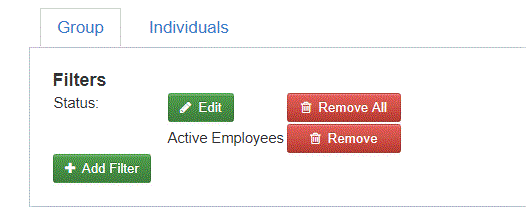
By default, all active employees are recipients. Click Add Filter to create a new filter. This will allow the recipient list to be limited to the employees specified in the filter.
Click Remove to remove a previously added filter.
SENDING INVITATIONS TO SPECIFIC EMPLOYEES
The Individuals tab allows invitations to be sent to individual employees.
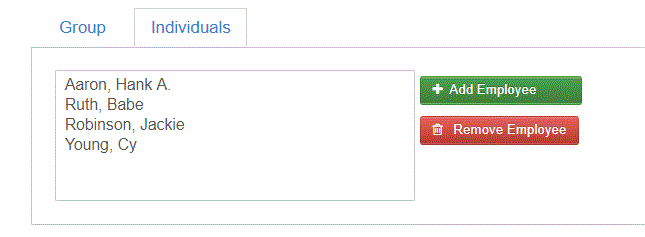
Click Add Employee to select the employees individually by name. Check the box on the employee nameplate(s) to include that employee. Click Select to add the selected employees to the recipients list.
Recipients may be removed by clicking on their name and then clicking Remove Employee .
Customizing the Invitation
The invitation subject line, body, from address, and whether to use the Employee’s home and/or work email may be customized.
-
The Additional Message will be included in the email body in addition to the default message text that contains instructions concerning the self-service website.
-
The Mode will determine which email address to use when sending the invitation to the employee. Invitations may be sent to the employee’s home email, work email, or both.
**Note: when Use home and then work e-mail address or Use work and then home e-mail address is selected. The system will first try to send the invitation to the first email address and if missing from the Employee’s record will send the invitation to the second email address.
Sending the Invitation
-
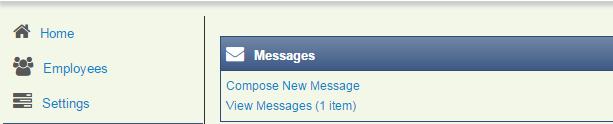
Click Send Invitation(s) to send the email to the selected employees. A system generated message will be available on the company Home Screen with the status of sent invitations.
-
Click View Messages on the Home Screen.
-
Click the Send Invitations subject line to open the message.
The number of sent and failed invitations will be listed. Invitations will fail when an employee record does not contain a valid email address.
Note: the system does not track the status of the email after it has been sent and if the individual received the email invite.